Thursday 6 September 2012

The Tigger Long-Legs Threesome are Here!

Hello again Everyone!  Cy Bear here - being allowed to introduce the three newest members of the ColdamCuddlies Family.  They were finally listed earlier today, under Etsy Listing #108763404.

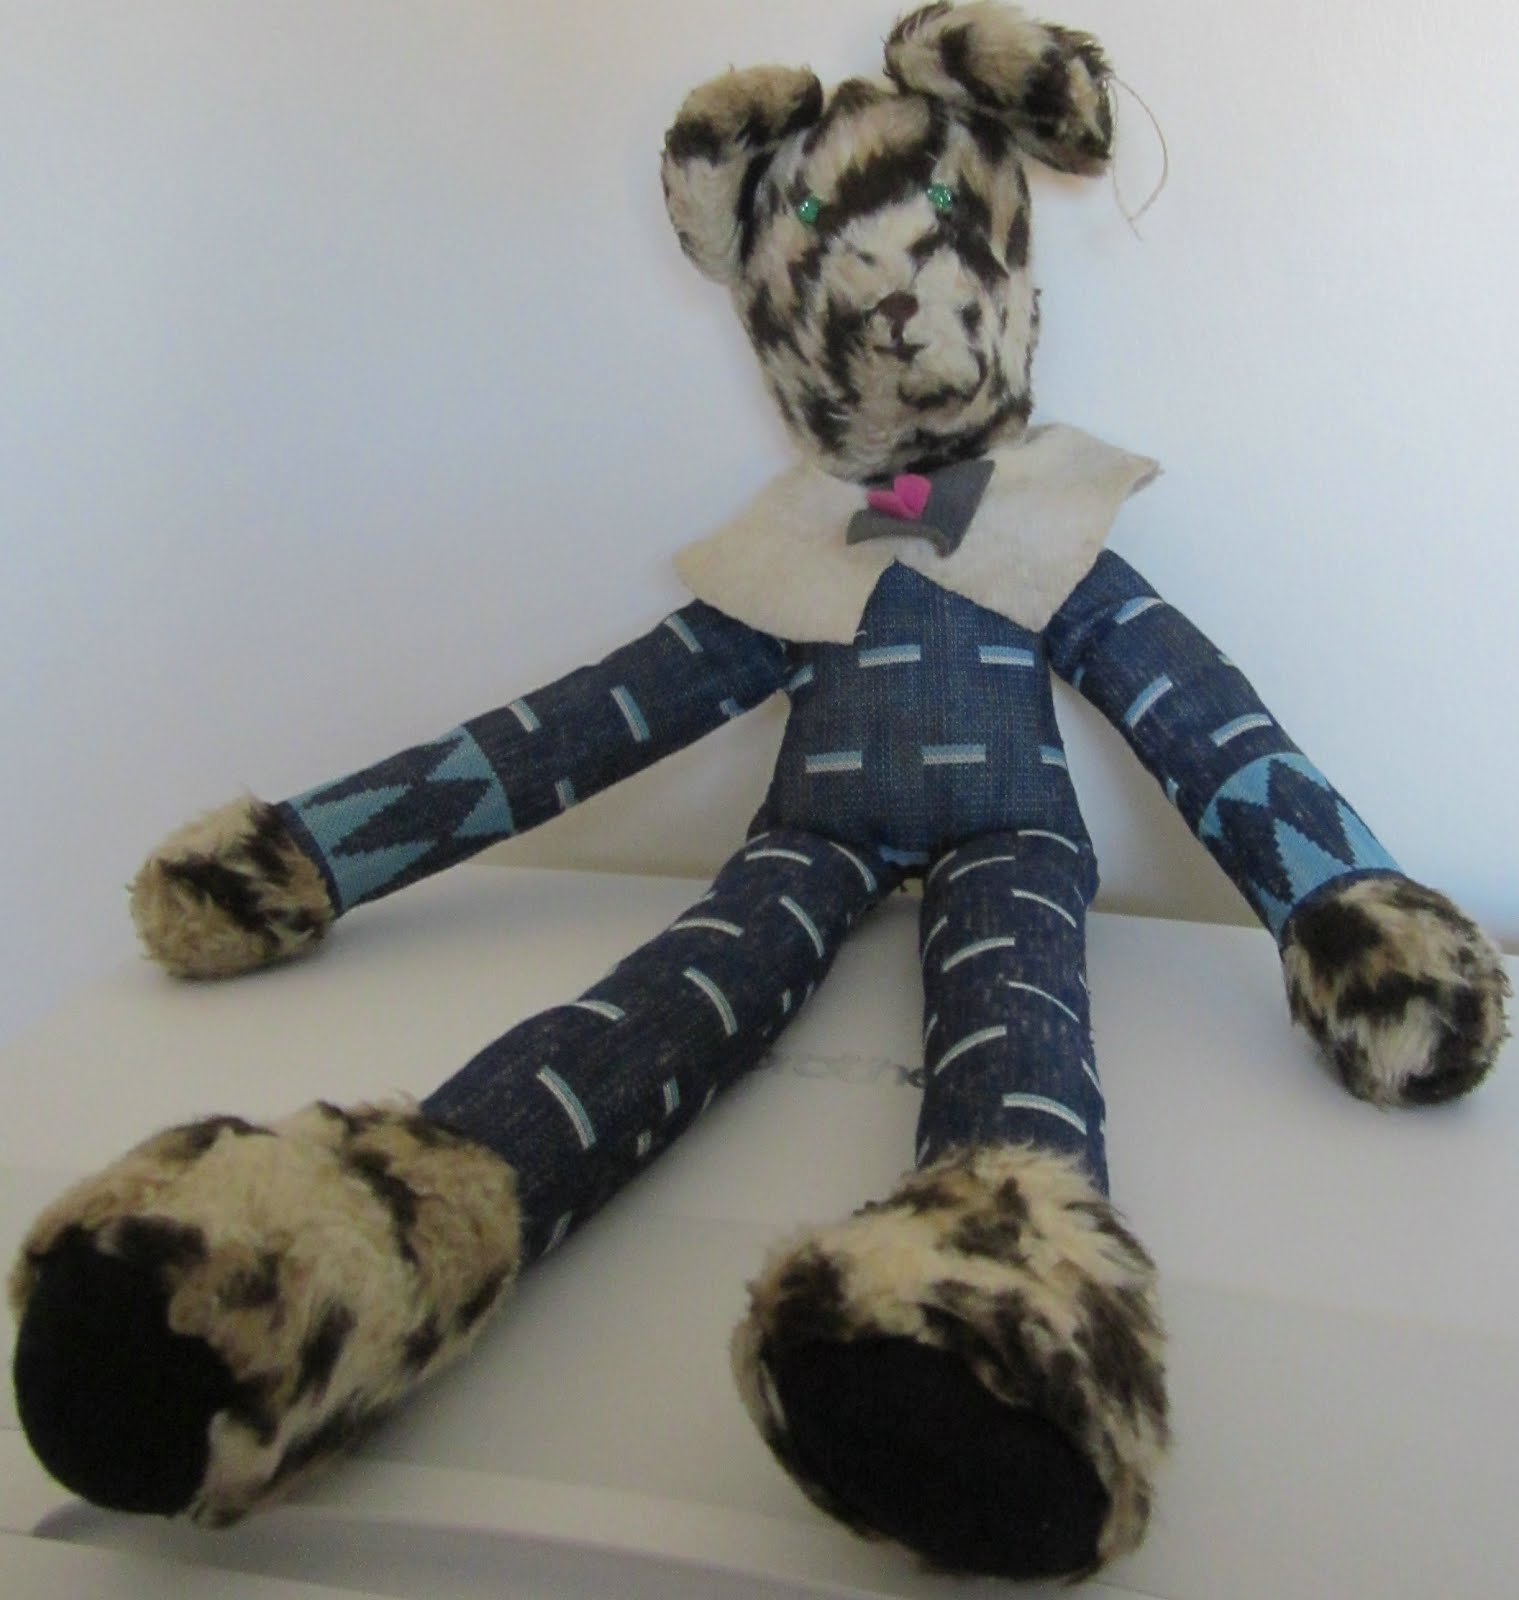
Towards the end of last month - 26th and 28th August respectively - Isobel posted here about how she had handled the Treatment of Long-Legged Tiger.  She (or it might have been myself) added that three new versions were in the process of being produced, after she'd created a template from Tiger himself.  This is the story of how they've managed to get into our Shop at www.Etsy.com/coldhamcuddlies.

In the end, Isobel actually cut out and partially sewed four versions, because the original material she had selected for one version - although very handsome- actually turned out to be completely unsuitable.  It frayed unmercifully and no matter how she tried, Isobel was unable to turn the finished body inside out.  The material was just too thick and stubborn, and her arthritic fingers (compounded by the injured right hand she was carrying at the time) could not cope.  So, both the body and the rest of the material she had in her stock were dumped unceremoniously in the dustbin.

The resulting replacement version is Denim Tigger Long-Legs, made from a remnant Isobel found when she was scouting around in her haberdashery outlet in near-by Warminster, "Think Outside the Box".  She gets her felt for our collars and the boots for our Lady Toys from there, as well as other items she comes across (principally our eyes!).

Denim Tigger  in the middle of this picture:  the others are Rusty Tigger Long-Legs (on the left) and Beige Tigger Long-Legs on the right.

Three's Company!
 As all three of them were made in the same way, the description of the sewing process can cover all of them, so this post should not be too lengthy.  The next photograph shows the original three versions spread over Isobel's dining table before she began to put them all together.


This picture shows the discarded version on the left of the circle.  It was made of a velvety fabric, which Isobel had previously been able to use to make tea cosies.  However, the cosies were much bigger and easier to turn inside out, because the material was quite thick and Tigger Long-Legs' limbs were just too small to accommodate the seams etc.  As is the normal procedure when working with tweed and other items with a tendency to fray, Isobel has oversewn all the seams to preserve the integrity of the toys.

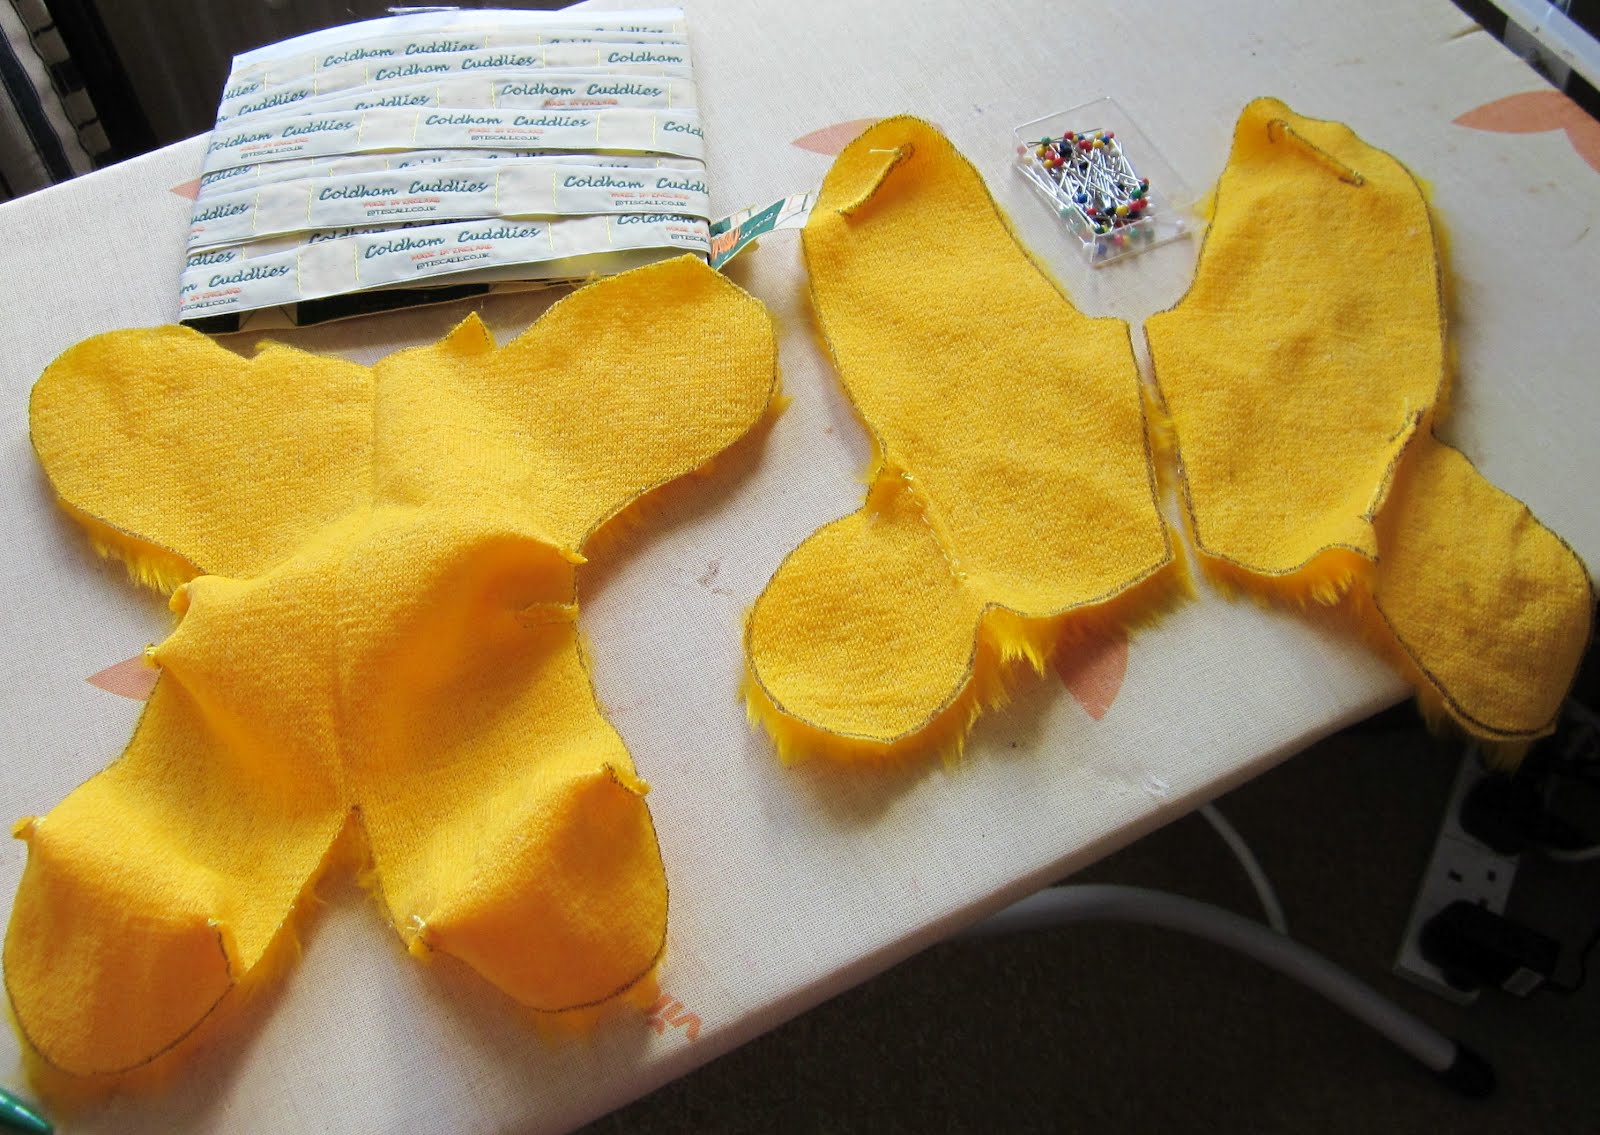
As you can see, they don't have as many different pieces as some of the rest of us ColdhamCuddlies do, so are relatively easy to put together.  The paws are sewn on to the arms and the body is sewn up and stuffed.  All three of the Tiggers are made to sit up - just like the model Long Legged Tiger - so, Isobel sews a double line at the top of each leg.  The legs are then stuffed from the bottom, sewn up and the paws stuffed and attached at the appropriate places on each Tigger toy.  The arms are stuffed and sewn at the top of each limb, and slotted into each side of the body.  Once attached, Isobel was able to stuff the body, and that left the head and ears.

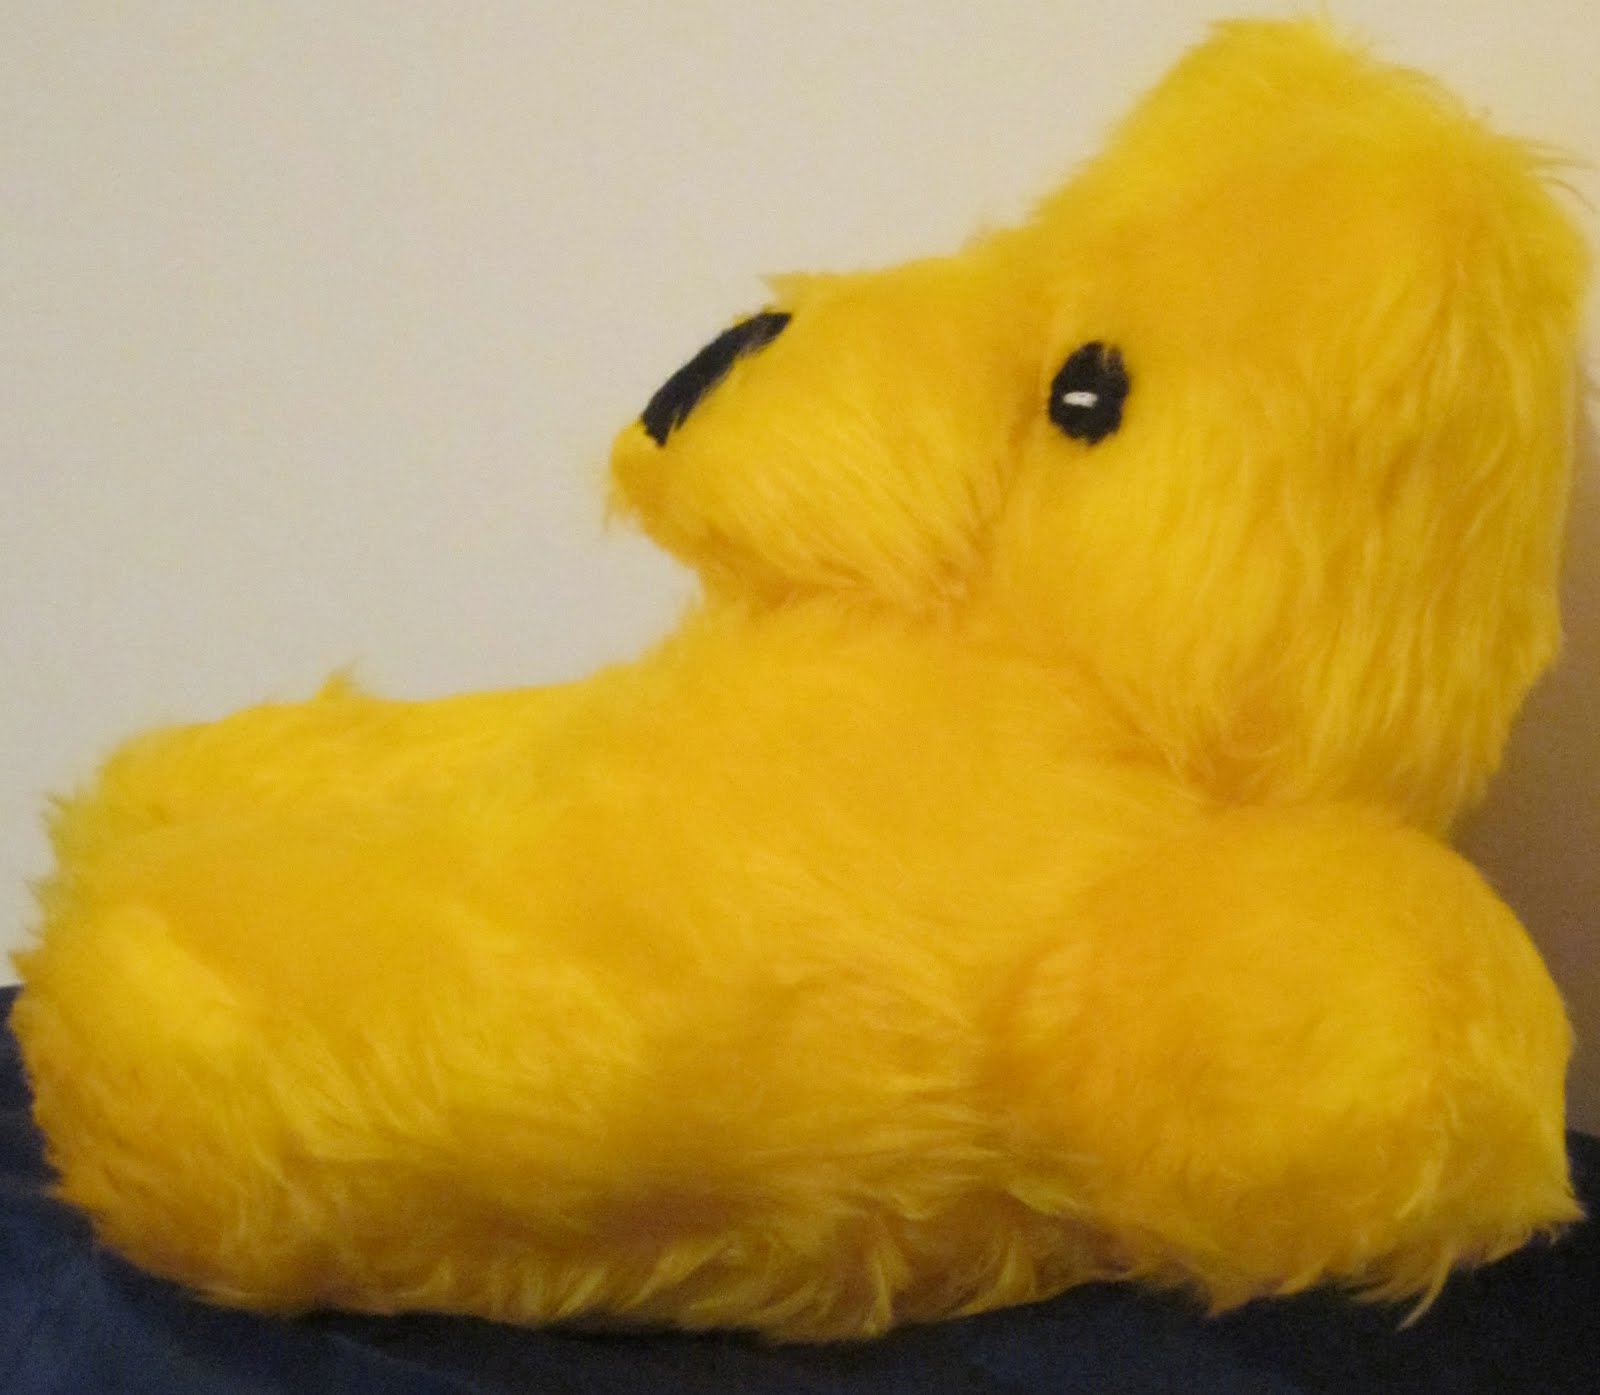
This is Beige Tigger Long-Legs
 Isobel seems to have adopted a new routine when it comes to making some of the recent toys.  Once she had placed the eyes in the appropriate spots, she used to stuff the heads and then attach ears, embroider the noses and mouths of us toys and then attached them to the body itself.  She's discovered that it's easier - at least on the more recent toys (the two new Golden Plush Glove Puppets and the Golf Club Head Covers in particular) - to do the facial expressions and then stuff the heads.  The ears are then attached; (sometimes that can take some time!)

Here's Rusty Tigger Long-Legs to join the party!  

Then the head and body get sewed together and Isobel then attaches the white felt collars.  Then, just to add a finishing touch, a multi-coloured lace is tied round the neck and sewn firmly into place and the collar turned over to create a crisp, smart finish to the toys.  The lace is then tied to form a neat bow, which, in turn, is sewn into place.

Lastly - but by no means least - here is Denim Tigger Long-Legs.
They all have mouths embroidered in with Black Double Knitting yarn - matching their respective noses - but because of the black print on the plush fabric, some of them don't show up as well as they might. 

All three have been listed as Tigger Long-Legs Plush Toys in our shop at www.Etsy.com/coldhamcuddlies under their unique Etsy Listing #108763404.  This information has been posted on all the Etsy team forums that Isobel regularly monitors and posts on.  Let's hope they all find their Forever Homes before too long - they are a cheeky bunch of chappies, I can tell you!

Until the next time, hope everyone is well.  It's been nice to post again - and I'm pleased to tell you that Isobel's wonky little finger is beginning to feel like it belongs to her right hand.  It still has a tendency to hit the wrong keys on the computer key-board, but not as frequently!  Good night; Cy Bear

Tuesday 4 September 2012

Back to School - now for Halloween!

It’s not just Back to School time:  it’s Back to the ColdhamCuddlies Shop on Etsy.com as well!  After being unofficially closed over the summer months, it officially opened September 1, and I’m pleased to inform you that we have our first order - for a Baby Brown Bunny, which  is off to its Forever Home in Spring, Texas, USA shortly. Let’s hope it’s an omen of things to come!

And to celebrate this auspicious occasion, I have a new White Plush Bunny who has joined Family, and is ready to be introduced to you, our wonderful Followers, as well.  She’s been listed in the shop for some time, and was made just before/and immediately after my dear Peter left us in May.  Needless to say, she was not completed until I got back to Heytesbury in June and I’d just listed her (and meant to back it up with a special blog about her) when, you may recall, I had to dash off to Nottinghamshire again to look after daughter Clare after she’d broken her leg.  Now Clare is well on the way to recovery, I’ve been back some weeks and begun to make new toys and replace others, and suddenly recalled that Hayley, the Hallowe’en Bunny needs to be properly introduced.


At the time I began to make her, I did not intend to label her as a Hallowe’en Bunny, but as I cut out her dress and worked out her decoration, it occurred to me that Black, White and Orange are very traditional colours for this particular season - and the rest, as they say, is history.  So, as Hallowe’en itself is now not that far away, perhaps this is not such an inappropriate time to tell you about Hayley, after all! 

As always, once the pattern has been applied to the fabric I’ve chosen, and it’s been cut out, I begin with the basic body stage.  Here is Hayley with her legs stuffed, and complete with her felt shoes, but still not stuffed in her body.


The next stage, once the upper body has got the polyester fibre inside and sewn up, is to make her pantaloons, which in Hayley’s case are made with white satin nylon, edged with some pretty lace which I found among the goodies I picked up during my last trip to my plush/tweed supplier in nearby Frome, Somerset (The Fine Quality Feather Company)

I’m due to visit them shortly to renew my stuffing stache and, hopefully, pick up another bag of off cuts.  It’s always a bit like Christmas-coming-early on these visits, because there is a huge big plastic bag waiting for me, which I then go through upon my return home and pick the bits I want to keep and discard the rest.  There are not often too many of the latter I have to say, but, because they are off cuts, some pieces may just not be suitable for me to attack on behalf of the toys and I don’t have the space for any “just in case I might need it later” decisions!

Toy pieces ready for assembly
 But, I digress:  once Hayley’s knickers are in place (I gather them at the ankles and waist and sew them to the legs and body respectively), then the dress top is put together, the arms are made by sewing the furry paws to the arm pieces and then both of them being stuffed and sewn in place each side of the dress bodice.


The skirt is then made.  That bit is easy, as it’s a piece of material 36” wide by 18” long, which is gathered at the waist, hemmed, and added to the body over the fitted pantaloons.  One has to adjust the gathers, so that they are evenly spaced round Hayley:  otherwise, the dress does not lie properly when she sits.  (Sometimes, the off cuts are not as wide as 36”:  that’s not necessarily a spoiler.  If I can make a skirt with material up to 28” wide, I have been known to do so - the skirt does not begin to look as though there’s not enough material there!  Any less than 28” though, and the resulting dress can look skimped.)  Once the skirt is satisfactorily fitted, I add the bodice/arm combination, fit it carefully (matching stripes, floral patterns if desired).  This join is actually covered by the apron waistband - but my conscience won’t allow me not to try to match things as I go along.  (Blame my needlework teacher of long ago:  she was a dragon of a lady, who used to make one undo all one’s work if she did not think it was done to her standards!  Habits learned in that way do die hard).

Now we’ve got the head to make:  that normally doesn’t take me too long to do, and I make up the ears at the same time.  Fitting the ears to any of the toys, but particularly the rabbits, can take me quite a while - I often find that one goes on quite easily:  getting the other one to match is another matter.  I used to have a similar problem with the eyes:  however, as I go along, that seems to have eased, as I make up my own techniques to achieve my aims.  Ears though can sometimes be a real problem - but the beauty of plush is that it can be taken apart quite easily, brushed with a wire brush, and then one begins again.


Before stuffing, one gets the eyes in place, making sure that they are firmly fitted.  Then, just recently, I’ve found it easier to embroider the nose and mouth, because one can get one’s hand into the head cavity and control the fabric better.  Then the polyester fibre is stuffed firmly in place, while at the same time, I adjust the shape of the head.  Then comes the ear fight and the head and body are ready to be put together. 


This apron is actually the last one to be made with this particular, opaque fabric.  Until now I've used this remnant from Clare's wedding dress (which I was privileged to be allowed to make), but alas, it has now run out!  Henceforth, all aprons will feature a muslin background, on which decoration - as I fancy at the time - will be applied.

All in all, my dressed Lady Toys take me about 5 days from start to finish:  the Gentlemen, with their complicated stocks and leather boots, jackets etc. take me a day or two longer.  I’m quite pleased with the way Hayley has turned out and as I’ve got enough material to be able to make three versions, I’ve described her as a Limited Edition (No.1 of Three) in Etsy Listing 103038453.  Do hope you like her!

Tuesday 28 August 2012

Treating Long-Legged Tigger, Part Two

Hello Everyone - Cy Bear  here.   I’m back again to complete the telling of Long-Legged Tigger’s recent treatment in the ColdhamCuddlies Soft Toy Clinic (Etsy Listing #79124185).  When I left off, poor chap was pegged out on the radiator-airer, waiting to be dry enough for the next stage of his therapy.

Once all the pieces were collected together, Isobel began wielding her needle and thread.  Both the body pieces were sewn together (leaving spaces for the arms to be fitted at the appropriate time).  Then all the other pieces (except the ears - which were already sewn together, and which caused the drying process to go on a little longer) were sewn up, including the head.  Both the arms had the paws sewn on before the under-arm seams were finished off  - by being over-sewn along all the seams, to preserve the integrity of the whole toy for the future.


This picture shows Tigger ready to be stuffed - his fur does look a much lighter colour, does it not?
 

The head also has new glass eyes fitted.  Tigger’s original ones were made with some green double knitting yarn, which had some sort of glitter substance weaving through it.  His eyes really did not show up, and Isobel also felt that once he’d been taken to pieces, the yarn would not stay in place for long.  So we’ve included two glass eyes which we’ve had in stock for some time, and Isobel has both sewn them in place, as well as leaving a long piece of yarn on each eye which she then tied together.  Little fingers, when playing with Tigger should not now be able to pull them out - hopefully!


Here the process of putting Tigger together is nearly complete - his body is  fully stuffed and so is the head, and he also has a black nose and a mouth.  (When he arrived, his nose was brown - and did not really show up that well - and he had no mouth at all).

Tigger’s original white felt collar was far too big for him and was badly stained to boot.  So Isobel used the collar pattern she uses for the other dressed toys, and drew Tigger’s just a little larger.  She then sewed a new white felt collar around Tigger’s neck and attached the grey/pink diamond and bow felt decoration with which he’d arrived. 

This is what Tigger now looks like.  Pretty much the same as when he arrived (you can see how that was in our last post on August 26, 2012).  We think he’s ready for many more playtimes with Little People visiting PamL’s home. 


Meanwhile, he’s waiting for two more toys to be treated in the Clinic, before he, Little Brown Ted and the remaining Patients can be posted back to their Toy Box home in Nottinghamshire.

See you around soon:  meanwhile, I am watching as Isobel gets on with the three new versions of Tigger Long Legs.  These may be delayed a bit, because unfortunately, she had a fall this morning and seems to have strained some ligaments in her right hand.  Her little finger and the next finger were bent backwards when she fell, and there is quite a bit of bruising involved.    It means she keeps hitting the wrong keys on the computer key-board, but otherwise hasn’t inflicted any permanent damage.  However, she has yet to see what effect it has had on her sewing and stuffing abilities.   I think she’s putting it off for a while - although she’s had ice packs on her hand (which reduced the swelling greatly) and has taken anti-inflammatory pills, which will probably send her off to sleep earlier tonight than usual.  It did mean that she missed Zumba today, because having hit her head slightly, she felt it was wiser not to go there and dance heartily - something she enjoys doing, but in the circumstances, might not be good for her overall, long-term health.
 
Right, that’s all from me for this post.  Thanks for calling in and commenting!  Look forward to the next time!  All the best - Cy Bear


Sunday 26 August 2012

Treating Tigger - the latest Patient in our Clinic (Part One)

Hello Everyone - Cy Bear taking over for a couple of posts,  since it was under my jurisdiction that you first heard about Long-legged Tigger. 

Long-Legged Tigger - on arrival

Just recently, Isobel has been calling him Tigger Long-Legs, but I’ve just pointed out to her that the latter name is what all our new Cuddlies (made like Tigger) will be called, once they get listed in our shop at www.Etsy.com/coldhamcuddlies.   They are going to be made with the template Isobel has created while Tigger was being assessed.  (Isobel here:  three versions have just been cut out, and once Cy Bear has finished this post, the assembly of each will begin.)

Long Legged Tigger has been one of the new Patients in the Soft Toy Clinic (Etsy Listing #79124185) when he featured in my post dated July 30, 2012).  His treatment has now been completed, and Isobel has suggested that I take over and tell you all bout it!  So, here goes:

As ever, the first thing that happens is that Isobel gets going with her Quick-Unpic and Tigger was soon in pieces. 


Then came the second stage - his bath.  Although he did not seem to be that dirty, Isobel was surprised at how much the water colour changed in the overnight soaking he received.  Isobel uses delicate, hand wash soap suds to clean the Patients, and starts them off in lukewarm water.  Once they’ve lost the surface dust, she then rinses them in cold water - she finds that more dust/dirt comes off that way. 

This time, as there were several bits of Tigger to contend with, Isobel loaded him onto a convenient wooden tray.


He’d had most of the remaining water squeezed out of him (she never wrings toys out - it could disturb the plush nap if  she did that, and besides her fingers/hands are now not as strong as they used to be!).  The pieces are a little fiddly too, so squeezing is the right method!

Then, Tigger’s individual pieces were pinned onto the radiator-airer and he was left over night, and most of the next day.  His ears, because they were double, took the longest to be ready for the next stage.  Isobel did not think they needed to be taken apart;  next time, she might think twice and separate them, although in the event they have turned out fine.


Having removed all the pieces from the airer, Isobel then got on with putting Tigger back into his original format, so that he could be stuffed. 


Because Tigger is quite an elderly toy, and even though the body fabric seemed to be quite strong, Isobel actually over-stitched (by hand, as it did not seem worth the effort to get her sewing machine out just to do the body and arms) each seam.  That will, hopefully, preserve Tigger's integrity for many more years to come.

Here is where  I’ll break for a while,  because this post - illustrated stage by stage as it is - will become far too long for everyone to read properly!  Folks do seem to do that - for which both Isobel and I are very grateful.  We do appreciate the comments made and the time you spend with us and I‘m pleased to say that we‘ve now 209 Followers and according to the Blogger stats, our viewings are now reaching the high 7,000‘s.  That is very gratifying!

The rest of Tigger’s treatment will follow in the next post - and Isobel is preparing another, rather unusual, post to include here at www.ColdhamCuddliescalling.blogspot.com.  However, some additional information is needed before putting fingers to the keyboard and preparing it for your edification! 

Until then, from both of us:  Cheerio - and God Bless!  Cy Bear. 

Tuesday 21 August 2012

The Making of Little Sleepy Teddy - the latest ColdhamCuddlies Bear

Earlier this month (August 16 to be exact), the post that day featured the treatment being given to a new Bear Friend of ours, Little Brown Ted (LBT).  Today, having created a template of LBT while he was undergoing his therapy in the ColdhamCuddlies Soft Toy Clinic (Etsy Listing #79124185), two versions of Little Sleepy Teddy are now listed in our shop at www.Etsy.com/coldhamcuddlies.  Here is the story, with illustrations, of them being created.

Here's one of  the Little Sleepy Teddys (LST for short) with his head under construction.


The pattern differs from those I usually make because it does not have a gusset.  It's actually easier in one way, because I can add the facial features first of all, before any stuffing is involved.  So, this will be the way I shall make these little fellows in future.

 (As I go on, I may experiment with the other Bears and Toys as well:  there's something to be said for being able to put in the noses at the same time as fitting the eyes prior to stuffing.  It's one of the real fascination of toy-making for me.  One can make one's rules up as one goes along - just to suit oneself!)

Once the head was complete,  the next thing on the agenda was the body.  Again, the pieces are arranged in a different way, with the back piece having no middle seam, and the shape being made by darts at strategic intervals along each side.


The legs and arms are incorporated into the back, while the side seams become the other half of each leg and arm and the whole body is finally closed by the front seam.  I had some difficulty deciding where to place the ColdhamCuddlies label (you can see some of them in the background waiting to be attached to future Cuddlies), trying the first one on the leg side seam and the other one under one arm on a side seam.


I sew these labels in making sure they do NOT come off easily, and the final result does not become apparent until the whole toy is stuffed. Thus,although I don't have a picture of it, in future that labels for LST will be on the side seam, under the right arm.  I decided to leave this one -  on the first version - on the leg seam, as I did not want any problems with the plush fur to become apparent.

This picture shows the head and body awaiting stuffing - just as happened when the reconstruction of Little Brown Ted took place (see the post on August 16):


Sewing the two bits together is actually a great deal easier with this particular pattern and will be a great encouragement to repeat the process should these little guys find their Forever Homes quickly.  I began to sew under the chin, using a ladder stitch, and matching the seams around the neck. A few stitches (literally) later and  hey viola! - Little Sleepy Teddy was complete.

Litttle Sleepy Teddy - Etsy Listing # 107350612

Just some extra photos showing these little chaps from different angles.

LST'S don't sit or stand easily:  they're easier to cuddle this way!
 Finally, just to round off the story, here is one for the ColdhamCuddlies Family Albumn - The Three Bears, altogether - before Little Brown Ted returns to his Toy Box in a few weeks' time.

Saturday 18 August 2012

The Promised Update on latest events

The Produce Sale in Heytesbury Parish Church took place as arranged, and I was given a nice space in which to display the smaller Coldham Cuddlies that have recently joined the family.  The space consisted of a trestle table which had been arranged on top of three church pews!  Very sturdy, but difficult to access without some agility on my part.  This involved hopping on to the seat of one pew and climbing over the back of the one in front, and lowering myself, via the kneeling bench, to floor level.  My Zumba classes have certainly helped, as it was not too difficult to accomplish, despite the concern of several of my fellow St. John's residents.  They clearly did not think me capable of such activity!  (Let you into a secret:  I wasn't sure myself, actually, but in the event, it was a cinch!)

Those being exhibited included the Hedgehog Family, The Owl Family (the latest was listed yesterday in our shop at www.Etsy.com/coldham cuddlies and has been named as Oliver Owlet, Etsy Listing #107123292 ), the replacement for Barry Beaver, and also the three prototypes Golf Club Head Covers - which will be listed later today, or over the week-end.  Black Gorilla was there too, but didn't seem to attract too much interest, but that may have been my fault, as he did get a little smothered by Baby Bunnies of different hues.

My two latest  Dressed Lady Bunnies were there too, with Jemima Bunny having a notice in front of her saying "Reserved:  Purchased in Mexico.  Destination:  Ontario Canada".  I'm waiting for a pattern for two bears, complete with their own uniforms (one a Policeman, I'm led to believe:  the other a Beefeater - of Tower of London fame!) and once they are made - if I can manage it - all three will go to Ontario together.  Will keep you all posted as and when!  Jemima was accompanied by the Halloween Bunny and they were both there to indicate the difference between one toy complete with a Carrot, and the other without.  (Naturally, a carrot can be added easily should a customer require it - but it will cost a little extra!)

MrDA-B, whom you may recall very kindly loaned me a Golf Club from his collection as a model, attended and was good enough to provide a customer test.  Pleased to report that all three passed with flying colours.  All were made with my existing Bear Head pattern, but appear as Golden Bear, Brown Bear and Panda Bear.  Now I'll try the same thing with a Rabbit's Head and the Fox's Head patterns, and have sent away for a Tiger toy, which I shall adapt along the lines I've done with Black Gorilla (BG - who featured in our post on August 12, 2012).

MrDA-B's  customer test consisted of putting his hand up through the tubular wool sock and confirming that, if needed, a bigger Club could be fitted into the space currently being occupied by his No.1 Driver.  He was also pleased with the elasticity displayed by my version of the Club's handle cover.  So, I  am now confident of introducing these new Cuddlies as full members of the Coldham Cuddly Family.

Here are photos of all three of them - not necessarily in order of preference or production:  just as they have been photographed:

The Golden Bear version:

Etsy Listing #107240612
The Panda Bear


Etsy Listing #107241362

The Brown Bear - I thought having a black handle cover would be just too much dark colour:  MrDA-B seemed to agree!

Etsy Listing #107242111

Our friend, Fred Bear still remains in a mutilated state as a Patient in the Soft Toy ClinicPatC, his Forever Friend, telephoned me early last week to say that during discussions between her sister and herself, both had come to the conclusion that my suggested fabric for his renewed paw pads was not entirely to their liking.  Elder sister, however, has got some delicate glove leather which she felt would be much more appropriate and both ladies wondered if I'd be prepared to wait until she returned home and searched for said leather.  Naturally, since they are the customers, there was no question of it being anything else but convenient!  (It did mean I could get on with the Golf Club Head Covers after all!)  So, as elder sister does not go back home until the end of August, and has difficulty getting around, seems it will be some time yet before Fred Bear can return home himself.  He's no trouble:  he's lying quietly in a corner, out of the way, so his further treatment report will have to wait too.

(Never being backward in coming forward, I did suggest that if elder sister had other fabrics that were looking for a home, and she considered them suitable for dressing future Cuddlies, I'd be more than happy to accommodate them as well as the promised leather!  Wouldn't you folks do the same?)

So, what did happen at the Produce Stall - other than an approval for the Golf Club Head Covers?  Not a lot really: except that almost at the end, one of my fellow stall holders came over and purchased one of the Baby Koalas - they really are a popular member of the Cuddlies Family!  So, the first venture into the 2012 selling arena was not entirely fruitless - especially as I really did not lay the toys out as well as I might have done.  Also, I was not expecting too much:  it was really an opportunity to show off the newbies, as well as rehearse for the real sales events later in the year.  The event really concentrates more on the provision of fresh bakery and garden produce, as well as a Raffle.  Last year I was quite lucky on the Raffle:  to date, this year, I have not!  Still there's a few weeks yet....  However, that means we have one less Koala in the Shop to sell:  although two more are still looking for Forever Homes!

Next thing on the agenda is the rehabilitation and creation of Tigger Long Legs and the Lop-Eared Bunny Arm Puppet.  Hope to have these up and ready for listing and sale in time for the 2012 Greatest Coffee Morning in the World (in aid of MacMillan Cancer research) due at Slater's Barn (as last year) on Friday, September 28.  So, off we go... until the next post!

Good bye for now.  Isobel


Thursday 16 August 2012

Litte Brown Ted's Therapy Programme

During Cy Bear's post on August 2 when he introduced some new Patients to the ColdhamCuddlies Soft Toy Clinic (Etsy Listing #79145185), he told you about Little Brown Ted (LBT for short).  Well, today's post is mainly about his treatment, but there are also some updates on other toys we've posted about lately as well.

First, though, as a reminder, here is LBT as he appeared on arrival from his long-term home in PamL's Toy Box in Nottinghamshire, England, UK:


The assessment of his condition concluded that LBT needed to be taken apart, destuffed, re-stuffed and sewn up again.  I also decided his presence in a different colour would be a real asset to ColdhamCuddlies Family, so while he was in pieces, I made a template for future use as Little Sleepy Ted.  I plan to make a several of him in the Golden Plush fabric which I've used in the past for the Hand Glove Puppets.


So, here is LBT in pieces, complete with all the stuffing with which he was shaped.  He was not as dirty as some of our previous patients, but still has benefited from this treatment.  His stuffing consisted of the nylon fibre that was available as an alternative to Kapok in the 1970's and 1980's, which proved to be inflammable if the item was placed near a live fire.  While LBT's stuffing was in pretty good condition, it did not provide the soft, cuddly feel that the polyester fibre fill I now use does, so it was consigned to the dustbin and at the appropriate time,  I filled him with the polyester equivalent.


The nylon fibre used had been packed in very tightly, which also contributed to his not being as cuddly as I like my bears to be.


Here he is, in pieces, drying out overnight:


Here is LBT with his head and body sewn up, waiting to be stuffed and joined together


Now, here is Little Brown Ted in all his current splendour.


While he was in pieces and being treated, I removed his original felt nose and eyes.  When I came to put him back together, they had mysteriously disappeared!  There are times when I am convinced that I have a friendly poltergeist living in my work room-cum-study-cum-second bedroom.  I'm always losing things and having them re-appear when they are no longer needed!  Wonder how many other folk suffer the same problem?

Anyway, to return to the subject of this post:  I cut out new black felt nose and eyes and attached them to the new version of  Little Brown Ted.  Although they are slightly bigger than the original, when compared with said originals (which did re-appear!), because LBT looks fluffier than he did on arrival, I have decided to retain the new facial features and think he looks a very handsome little bear.  He's got soft fur again, and he's very tactile.  His new little friends should enjoy playing with him in future.

Having said there are updates on other items mentioned in recent posts here on www.ColdhamCuddliescalling.blogspot.com, I think this post has gone on long enough.  So, I'll post about the updates next time around - which will be the week-end, after the upcoming Produce Sale at Heytesbury Parish Church.  I've been able to produce two prototype Golf Club Head covers and they will be on sale.  Will be listing them in the shop at www.Etsy.com/coldhamcuddlies next week - unless of course they've found new owners in the meantime!

Until then - thanks for all the nice comments recently received.  Good night, and God Bless!  Isobel